Followers

Wednesday, 28 November 2012

Good Luck

This is a card i have made for a colleague who is due to leave to have a baby soon,we are not sure what she is going to have so I have kept it very neutrals in greens and yellows.
I always try to colour the Tilda similar to the person leaving and 3d the bump so it looks more realistic.
I have used  Stampin up card and some baby paper I had in stock. I have used spellbinder dies for the topper and coloured the image with alcohol inks.

I think the colour on this card is more realistic, this is the problem when taking photo's on a night. The Good Luck is in white, I then finished the card by adding a teddy charm to the knot and co-ordinating flowers .
Thanks for stopping by if you need any information please ask.
Please let me know you have visited
Taniaxx
Challenge entered  Simon Says Stamp  Anything Goes
Crafts and me Challenge  Ribbon & Trims
Deep ocean Challenge           Pastels
Party time Tuesday  Anything goes

Monday, 26 November 2012

One for the boys

 Ok so here is something a little different. Why because if you saw the stamp set i used you would understand why, I also used the cogs  and crackled background and grunge polka dots. So here he is meet my robot. The first time i saw the stamp set this is what I wanted to do and I am so please how her turned out.


I have used stampin up inks and card. To put his limbs on i made a mask of the large film frame, and then I could line up his arms and legs..
Thanks for looking I hope you like my card, if you need any information don't hesitate to ask. Let me know you have been  Thanks Tania xx
Challenge entered   Pile it on Anything but a Christmas Card
          Joanna Sheen Challenge Blog     Anything goes excluding Christmas
                           Make it Monday    Anything goes
                            One crazy stamper Anything goes
                       Emergency Stampers         Anything Goes

Sunday, 25 November 2012

Glamour & glitz


 Here is my card for today I made it to take part in a challenge blog. I liked the simply idea and made 5 altogether. I used the sentiment and stamp from my Stampin Up stash. The tree was stamped in pigment ink and the sentiment in versa fine ink. I then embossed both in a fine clear holographic embossing powder. This gives the card a rich iridescent shine which will not e seen on the photo's. But can be seen in real life.
I then finished off with adding pink rhinestones to this tree, to give it the true glitz treatment.
The first card is a A6 landscape and this is a 12 cm square card with mini carbouchons added to the tree.
Thanks for calling by please let me know you have visited Tania x

Challenge entered Simply less is more Glamour & Glitz week 95
                             Hiding in my craftroom         Christmas
                            Crafty Creations Challenge      Christmas is coming
                            Paper Creator's Craft challenge All about Christmas

Tuesday, 20 November 2012

It started with a Kiss


 Hi this is today's card, I have made for my Husband for Christmas. its very apt when our surname is Scott and his nickname is Scotty, as i have said he likes cards that less is more. so Merry Christmas darling, love you lots. Will be a bit strange this year we lost his sister in January at only 40 so  his Mum will be spending Christmas with us.
So what did I do I stamped the image with a dye based ink and coloured it with my alcohol pens, mounted it on real red and black scraps of card and then mounted it on a pre-embossed holly card. I made sure the apature  was fully covered as the card had a square hole in it :). it was finished off with a metal holly leaf embellishment that i just touched with alcohol pens to pick out the veins in the leaves and the berries.
Thanks for looking if you need to know anymore information don't hesitate to ask. Also if you visit please let
me know you have been so I can visit you :)
. Thanks Tania

Card entered into  The Little Claire's Monthly challenge Christmas
                             make it Monday always anything goes
                             Cards for Men    Merry Christmas
                             The Squirrel and the Fox Anything goes
                            Creative Card crew anything goes
                             Craftcreations blogspot all things christmas

Monday, 19 November 2012

Flutter by


Today's card is using  my favorite insect, the butterfly. I used primrose petal ink and stamped the butterfly in a random pattern over the card. The only full inked stamp is the main butterfly the rest are second and third stampings. I then stamped the butterfly on scrap card in the pink and onto a card bag in the black using a stazon ink. I cut them out making sure i  had both layers of the bag. I then mounted the butterfly first acetate then cardboard then topped it with the acetate. First 2 layers were using 3d glue and the last layer glossy accents.

 I then stamped the sentiment  in black on to the primrose petal card and embossed with a clear hologram embossing powder and mounted it on 3d foam.
The card was finished off with the primrose petal  ribbon.
Thanks for calling by , please let me know you have visited also if you went any information on the wonderful stamps or card etc that i have used don't hesitate to ask. Txx
Challenge entered  The ABC challenges B is for butterfly
Paper playtime Challenge anything goes


Sunday, 18 November 2012

It's a Boy

This is my baby boy card, i love its simplicity . I even did a bit of sewing with the marina mist bakers twine,to link the buntin. The buntin is stamped in Marina Mist ink and the rest of the images are stamped in a black dye based ink so I could colour them with my alcohol inks this stops the ink bleeding.
 I then blended the background with marina mist and wild wasabi ink. the topper is mounted on marina mist card this co-ordinate the layers. I finished  the card off by adding a teddy bear charm.
Thanks for stopping by if you need any information on to how i did what ,please ask. Do let me know you have called, i can then pop and visit you Thanks Tania xx
Challenge entered      My time to craft challenge blog New Baby
                                 Craft Punked week 46 anything goes
                                 Paper crafting Journey anything goes
                                Lady annes stamp challenge anything goes

Saturday, 17 November 2012

Less is More


Some times Less is more, so I decided to come out of my comfort zone and do no stamping on a card. Not easy when I just love to get inky. So what did I do I used the Holiday Frame stampin' up embossing folder in the middle of my card. Joined a metal Christmas tree charm on to the bell and ribbon charm and then used silicon glue to add it to the card then using 3d foam added the  sentiment to the middle of the embossing oval and there you have it quick and simple and effective for those minimalistic people in your lives.
Thanks for calling by, if you like my card please let me know you have been. if you need any information on supplies don't hesitate to ask , Tania xx

Card entered in to  Less is more challenge blog  Hardware
                             The Stampman Emboss
                              Clearly Inspired challenge blog Clean and Simple
                             Little red wagon Challenge texturize it

Thursday, 15 November 2012

Another thank you


We always need to be able to say thank you, if someone helps you out or just to let people know you appreciate what they do for you. So here is mine, I used a 13cm square of white card and stamped it with grunge polka dot and crackle background in marine mist ink. I then inked the square using the ink with my brush to blend the background in. Next I used an off cut of kraft card and stamped the flower in crumb cake ink, and re stamped the center of the flower in the blue ink.
The stamens of the flowers had a glitter glue added. I then mounted the flower with 3d foam on to the background. I used a die cut ,to cut out the thank you from marine card. The background was then mounted on Crumb cake (kraft) and marine mist card, I added the marine mist ribbon before I finally mounted on a 15cm card base. Finishing with Chocolate pearls on the ribbon
Thanks for calling by I hope you like my card and if you need any information of the stamps or card used I would be happy to share. Please let me know you have been so i can visit youin blog land Taniaxx
Challenge blogs entered
                                   Pile it on challenge blog       Lets be thankful
                                Card making Mamas Thanks giving/thank you card
                               Dutch Dare Card Challenge  Diamonds an pearls

Tuesday, 13 November 2012

Thinking of You


Sympathy cards are not the easiest card to make, and I much prefer to make thinking of you. So here is mine made with a  lily stamp, which is coloured with alcohol pens ,
 The card stock is crumb cake which goes very well with the white card, creating a classic look. The swirl  stamp which came with the lily stamp was stamped in crumb cake ink on the co-ordinating card. The image was finished off with white satin/organza ribbon and mounted on gold card. I have used this stamp many times and depending on the colours used can be for any event. The sentiment was then embossed in gold embossing powder to match the topper.
Thanks you for stopping by, please let me know you have visited. If you need any information as to supplies please drop me a line and I will get back.  Hugs Txx
Card entered into Simon says stamp  challenge blog. Thinking of you/Sympathy
                           Papertake weekly challenge blog. Flower Power
                           Craft your passion challenge blog clean & simple

Monday, 12 November 2012

There is a Goddess in us all

This is my card for today and yes there is a Goddess in all of us, that's what I keep telling myself.
I have used a new set of stamps called Beauty is art from Visible Image. For my main focal topper i used a piece of mount board and embossed it 3 times with ultra thick embossing powder, the last layer was a red/gold embossing powder. I inked up the torso stamp in black ink and stamped into the melted embossing powder. This gives a deep etched imprint.

I then stamped the border and corner stamp from the same set  in versa mark ink on black card and embossed it with gold embossing powder. I did this with the Goddess stamp also. The black card is then mounted onto  Matt gold card , then black and then gold. Finally it is mounted onto a piece of black embossed card.I mounted the  goddess stamp the same way. I finally finished it off with some gold sheer ribbon.
I think it makes an elegant card, let me know what you think. Thanks for visiting please let me know you have called by, if you need anymore information about the techniques I have used please ask  Tania xx
            Challenges entered:     Gingerloft Challenge A touch of Gold
                                              Crafty Creations Challenge      No Flowers
                                               Crafts and Me Challenge   Reds

Sunday, 11 November 2012

Sometimes

Sometimes we need a card to let people know we will always be there for them. That our door is open and that they only need to ask!
This is mine. Keeping with my husbands favorite phrase less is more, I stamped the image straight on to the card. Brave I know and then coloured with alcohol pens.


Please let me know you have visited , I get lonely here in blog land , and if you need any information on stamps etc I will be happy to share.
Hugs Txx

Card entered into  simply less is more challenge blog one layer /Houses
                              Bearly-mine challenge anything goes

Immortal Love


Hi its Sunday again and here is this weeks  Card Immortal Love what a wonderful stamp set it can be used in grungy design or beautiful clean image. The barbed wire is a must can be used in male or female cards. Today will be the last day I post as a design team member for Visible Image. Due to other commitments I feel I can not promote the wonderful stamps enough, and wish Mark & Helen  ever success for the future.
So what did I do, I  first used the small rose and randomly stamped the small rose with crumb cake ink on to a 15Cm square Kraft card. Secondly I used a  12Cm square of white card and used the barbed wire stamp in  olive green to form a border , then I stamped 4 of the small image shape to resemble leaves after this I used distress ink to give the card a aged look, this is then mounted on a 12.5Cm square of olive green to pull the card together and mounted on 3d foam onto the card base. . To form the rose I used the large rose stamp and stamped it 4 times on card and then coloured with Promarkers(  make sure you use a memento ink or similar dye based ink, not alcohol based as this will run with the pens).
 I then cut the first rose fully out then cut the back layer off for the second and so on until I had four layers to decoupage. I used silicon glue to mount the layers , rounding each layer to give them a more realistic look. Once the flower is dry,( I usually leave mine over night) it can be mounted on the card.
To finish off I used dew drops in each corner.
Hope you liked my card if you need any information about what I did please ask. Please let me know you visited. do keep calling back to see my new cards. I will still be playing out with the memebers on the facebook site
Thanks Tania x
Love & and best wishes to Mark & Helen, good luck for 2013 and thank you for taking me on the start of their Journey.

Card entered into
Challenges 4 everybody anything goes
Without words Challenge blog Whizz bang (Bright Colours)

Monday, 5 November 2012

Colour Combo


I decided to put two of my favourite colours together, and I think they compliment the card so well. I made this card for my Mum there is a lot of meaning behind it  and we will be friends forever :). I love the image another great from Crafter's companion.
I am going to enter it into The Crafters Companion Monthly Blog Favourite Colour combination.
Thanks for stopping by, please leave a comment to say you have beeen Txx

Sunday, 4 November 2012

Monochrome Christmas

I have made this Christmas card with the wonderful Christmas collage from Visible Image. It is a great image you can stamp it on a large card A5 like I have, adding the grunge flourish as a border around. I embossed the stamps in white embossing powder on the black card.
 I then added a pieces of  card embossed using snowflake folder and dusted with black distressed ink. the topper is then mounted on black card then finally on a white card, finished off with a white ribbon.  Thanks for visiting please leave a comment to let me know you have visited, Tania xx

I have entered this card in the Stamping Sensations challenge Traditional Christmas                                             

Beauty is Art part 2

This is my Sunday Design Team card for Visible Image made with the wonderful Beauty is Art set, Its very plain but I think very classy the stamps do the talking.I used the body stamp out of the set, I first stamped the stamp in black in the middle of a 13cm square piece of card, then stamped with the second stamping of ink bodies around the first, tessellating the pattern ( this means you ink the stamp up, then stamp off on to waste paper then stamp the second image onto the card, ink up again and repeat).
 I then using a pigment based black ink stamped the image onto  heat proof acetate then embossed with fine black embossing powder. I did wipe the acetate down with a anti-static bag first to stop the embossing powder sticking to it, I then used glossy accents to mount the image on the card. After that I mounted the topper on to silver miri and then black card. I then stamped the beauty stamp on white card , edged in black ink and mounted on silver miri  & black card.
Dont forget to check out our facebook site and Visible Image Blog for all the current information,challenges ( This month its Sparkle you have to be in it to win it :) ) and design team cards
Thanks for stopping by , please let me know you have been, its nice to read your comments . Also if you have any questions about the products I have used  or techniques please don't hesitate to ask . Tania xx

Challenge entered Come and Get it Challenges and Creative Stamp Friends

Saturday, 3 November 2012

Thank You

Here is a card I made just to say thank you, sometimes its nice to feel appreciated.
I have used the butterfly stamp  from Visible Image, just love this stamp I stamped the butterfly twice first & second stamping then cut off the top part of the pale wings and mounted the larger wings with 3d glue. I then stamped the butterfly onto heat embossable acetate and embossed with clear holographic powder from WOW and mounted it over the butterfly . I then used my Tonic punch and die to cut out of pale pink card a border and base for the butterfly . Finishing off with the thank you sentiment from Stampin Up.
Thanks for stoppping by ,please let me know you have been it gets lonley here in blog land Txx  Card entered in  Less is more Pink challenge , Dutch-dare card challenge Thankful also A for Appreciation from The ABC Challange

Beauty is Art from Visible Image


YES  FOLKS!!!!!!!!! the stamps you have been waiting for are here "Beauty is Art" , "Immortal Love" and "Free your Imagination"  Check them out and get your orders in they have certainly been worth waiting for, great for cards and scrap-booking all stamps are linked direct but can be found on the Visible image website. My first card is from Beauty is Art, a beautiful stamp set with such potential.


When I first saw the border stamp I decided it would be great to weave with, So I stamped a 10cm strip from A4 card the first in black then the second is the next ink stamp until the sheet was full. I then trimmed of each end and cut the strips in to 1cm wide horizontally across the stamp,then halved the strips. Then weave with the strips until you have the size you need.
I forgot to actually take the black and grey but here is the grey and orange I made after.
After this I added tape to the back of the weave so it didn't fall apart then mounted it on silver miri (13cm sq) card then mounted on black card (14cm sq) then  on the 15cm  sq white card.

If you decide not to cut the panel up you could always mount it up as a very classy card.

To make the flowers I cut out 3 base flowers and 6 white flowers and stamped them with the border stamp.
then you need to cut the flowers in half and fold to make 1/8th .
Theses are then mounted on each alternate petal and topped with a dew drop.

I then stamped the art stamp  on to white card and mounted it up on silver and black to complement the rest of the card. Then adding dew drops to the other corners


Don't forget to check out our Facebook site and Blog regularly  to keep up to date with all the news, including current monthly challenges SPARKLE, offers and more.
 This is the same card stamped in the orange and grey, thought I would show it you made up.
Thanks for visiting if you like my card let me know you have visited, if you need anymore information on to how I did what don't hesitate to ask Thanks Tania x
Don't forget to visit the site for the links to the other design teams websites. Just click the logo to be taken on a visual adventure.

Challenges entered

Thursday, 1 November 2012

Let us "Sparkle"


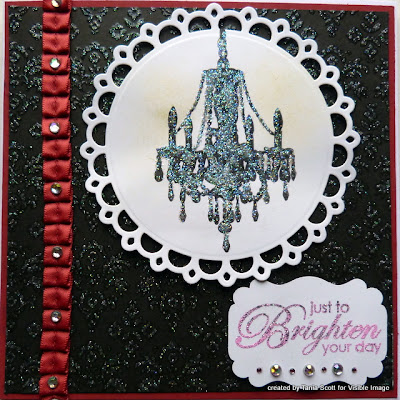
Hi folks here is my card for the new monthly challenge Sparkle. give it a click and enter your card all stamps used for my card are from Visible Image . I have used the Chandelier from the Chandelier stamp set on a spellbinder circle of whisper white card from Stampin up. I first stamped the image with a black versafine pad this picked up all the details of the stamp also the ink dries quickly ,after that I used icicle stickles to cover the complete image, the stickle glue is slightly opaque so you can see the chandelier through the SPARKLE. I then let this dry overnight, due to thickness of the glue.
For the card base  I used a 15cm square white card and mounted a 14.5cm square of  redridinghood card from stampinup  the black card is already embossed with glitter and comes from the Noir et Chic pad from First Editions perfect for my sparkle card and complements the chandelier. I then used the red ridinghood ruffle ribbon down the left side and added iridescent stones. Once the image was dry I added a little yellow ink so the lights appear to be glowing  and mounted it on 3D tape. The sentiment is also from the chandelier set stamped on card withe versamark  and embossed then I finished off the sentiment topper with more iridescent stones.


Thanks for looking , don't forget to enter your SPARKLE card into the challenge with a chance to win great prizes.
DON'T FORGET to Keep up to date with all the current happenings on Facebook and New products.
New stamp big launch on the 3rd.
Thanks for calling by please let me know you have been.
Thanks txx
I have entered this card into the all things Sparkly from the Whimsy Stamps Challenge also entered Bling it up from Crafts and me Challenge blog