Followers

Thursday, 15 November 2012

Another thank you


We always need to be able to say thank you, if someone helps you out or just to let people know you appreciate what they do for you. So here is mine, I used a 13cm square of white card and stamped it with grunge polka dot and crackle background in marine mist ink. I then inked the square using the ink with my brush to blend the background in. Next I used an off cut of kraft card and stamped the flower in crumb cake ink, and re stamped the center of the flower in the blue ink.
The stamens of the flowers had a glitter glue added. I then mounted the flower with 3d foam on to the background. I used a die cut ,to cut out the thank you from marine card. The background was then mounted on Crumb cake (kraft) and marine mist card, I added the marine mist ribbon before I finally mounted on a 15cm card base. Finishing with Chocolate pearls on the ribbon
Thanks for calling by I hope you like my card and if you need any information of the stamps or card used I would be happy to share. Please let me know you have been so i can visit youin blog land Taniaxx
Challenge blogs entered
                                   Pile it on challenge blog       Lets be thankful
                                Card making Mamas Thanks giving/thank you card
                               Dutch Dare Card Challenge  Diamonds an pearls

Tuesday, 13 November 2012

Thinking of You


Sympathy cards are not the easiest card to make, and I much prefer to make thinking of you. So here is mine made with a  lily stamp, which is coloured with alcohol pens ,
 The card stock is crumb cake which goes very well with the white card, creating a classic look. The swirl  stamp which came with the lily stamp was stamped in crumb cake ink on the co-ordinating card. The image was finished off with white satin/organza ribbon and mounted on gold card. I have used this stamp many times and depending on the colours used can be for any event. The sentiment was then embossed in gold embossing powder to match the topper.
Thanks you for stopping by, please let me know you have visited. If you need any information as to supplies please drop me a line and I will get back.  Hugs Txx
Card entered into Simon says stamp  challenge blog. Thinking of you/Sympathy
                           Papertake weekly challenge blog. Flower Power
                           Craft your passion challenge blog clean & simple

Monday, 12 November 2012

There is a Goddess in us all

This is my card for today and yes there is a Goddess in all of us, that's what I keep telling myself.
I have used a new set of stamps called Beauty is art from Visible Image. For my main focal topper i used a piece of mount board and embossed it 3 times with ultra thick embossing powder, the last layer was a red/gold embossing powder. I inked up the torso stamp in black ink and stamped into the melted embossing powder. This gives a deep etched imprint.

I then stamped the border and corner stamp from the same set  in versa mark ink on black card and embossed it with gold embossing powder. I did this with the Goddess stamp also. The black card is then mounted onto  Matt gold card , then black and then gold. Finally it is mounted onto a piece of black embossed card.I mounted the  goddess stamp the same way. I finally finished it off with some gold sheer ribbon.
I think it makes an elegant card, let me know what you think. Thanks for visiting please let me know you have called by, if you need anymore information about the techniques I have used please ask  Tania xx
            Challenges entered:     Gingerloft Challenge A touch of Gold
                                              Crafty Creations Challenge      No Flowers
                                               Crafts and Me Challenge   Reds

Sunday, 11 November 2012

Sometimes

Sometimes we need a card to let people know we will always be there for them. That our door is open and that they only need to ask!
This is mine. Keeping with my husbands favorite phrase less is more, I stamped the image straight on to the card. Brave I know and then coloured with alcohol pens.


Please let me know you have visited , I get lonely here in blog land , and if you need any information on stamps etc I will be happy to share.
Hugs Txx

Card entered into  simply less is more challenge blog one layer /Houses
                              Bearly-mine challenge anything goes

Immortal Love


Hi its Sunday again and here is this weeks  Card Immortal Love what a wonderful stamp set it can be used in grungy design or beautiful clean image. The barbed wire is a must can be used in male or female cards. Today will be the last day I post as a design team member for Visible Image. Due to other commitments I feel I can not promote the wonderful stamps enough, and wish Mark & Helen  ever success for the future.
So what did I do, I  first used the small rose and randomly stamped the small rose with crumb cake ink on to a 15Cm square Kraft card. Secondly I used a  12Cm square of white card and used the barbed wire stamp in  olive green to form a border , then I stamped 4 of the small image shape to resemble leaves after this I used distress ink to give the card a aged look, this is then mounted on a 12.5Cm square of olive green to pull the card together and mounted on 3d foam onto the card base. . To form the rose I used the large rose stamp and stamped it 4 times on card and then coloured with Promarkers(  make sure you use a memento ink or similar dye based ink, not alcohol based as this will run with the pens).
 I then cut the first rose fully out then cut the back layer off for the second and so on until I had four layers to decoupage. I used silicon glue to mount the layers , rounding each layer to give them a more realistic look. Once the flower is dry,( I usually leave mine over night) it can be mounted on the card.
To finish off I used dew drops in each corner.
Hope you liked my card if you need any information about what I did please ask. Please let me know you visited. do keep calling back to see my new cards. I will still be playing out with the memebers on the facebook site
Thanks Tania x
Love & and best wishes to Mark & Helen, good luck for 2013 and thank you for taking me on the start of their Journey.

Card entered into
Challenges 4 everybody anything goes
Without words Challenge blog Whizz bang (Bright Colours)

Monday, 5 November 2012

Colour Combo


I decided to put two of my favourite colours together, and I think they compliment the card so well. I made this card for my Mum there is a lot of meaning behind it  and we will be friends forever :). I love the image another great from Crafter's companion.
I am going to enter it into The Crafters Companion Monthly Blog Favourite Colour combination.
Thanks for stopping by, please leave a comment to say you have beeen Txx

Sunday, 4 November 2012

Monochrome Christmas

I have made this Christmas card with the wonderful Christmas collage from Visible Image. It is a great image you can stamp it on a large card A5 like I have, adding the grunge flourish as a border around. I embossed the stamps in white embossing powder on the black card.
 I then added a pieces of  card embossed using snowflake folder and dusted with black distressed ink. the topper is then mounted on black card then finally on a white card, finished off with a white ribbon.  Thanks for visiting please leave a comment to let me know you have visited, Tania xx

I have entered this card in the Stamping Sensations challenge Traditional Christmas                                             

Beauty is Art part 2

This is my Sunday Design Team card for Visible Image made with the wonderful Beauty is Art set, Its very plain but I think very classy the stamps do the talking.I used the body stamp out of the set, I first stamped the stamp in black in the middle of a 13cm square piece of card, then stamped with the second stamping of ink bodies around the first, tessellating the pattern ( this means you ink the stamp up, then stamp off on to waste paper then stamp the second image onto the card, ink up again and repeat).
 I then using a pigment based black ink stamped the image onto  heat proof acetate then embossed with fine black embossing powder. I did wipe the acetate down with a anti-static bag first to stop the embossing powder sticking to it, I then used glossy accents to mount the image on the card. After that I mounted the topper on to silver miri and then black card. I then stamped the beauty stamp on white card , edged in black ink and mounted on silver miri  & black card.
Dont forget to check out our facebook site and Visible Image Blog for all the current information,challenges ( This month its Sparkle you have to be in it to win it :) ) and design team cards
Thanks for stopping by , please let me know you have been, its nice to read your comments . Also if you have any questions about the products I have used  or techniques please don't hesitate to ask . Tania xx

Challenge entered Come and Get it Challenges and Creative Stamp Friends

Saturday, 3 November 2012

Thank You

Here is a card I made just to say thank you, sometimes its nice to feel appreciated.
I have used the butterfly stamp  from Visible Image, just love this stamp I stamped the butterfly twice first & second stamping then cut off the top part of the pale wings and mounted the larger wings with 3d glue. I then stamped the butterfly onto heat embossable acetate and embossed with clear holographic powder from WOW and mounted it over the butterfly . I then used my Tonic punch and die to cut out of pale pink card a border and base for the butterfly . Finishing off with the thank you sentiment from Stampin Up.
Thanks for stoppping by ,please let me know you have been it gets lonley here in blog land Txx  Card entered in  Less is more Pink challenge , Dutch-dare card challenge Thankful also A for Appreciation from The ABC Challange

Beauty is Art from Visible Image


YES  FOLKS!!!!!!!!! the stamps you have been waiting for are here "Beauty is Art" , "Immortal Love" and "Free your Imagination"  Check them out and get your orders in they have certainly been worth waiting for, great for cards and scrap-booking all stamps are linked direct but can be found on the Visible image website. My first card is from Beauty is Art, a beautiful stamp set with such potential.


When I first saw the border stamp I decided it would be great to weave with, So I stamped a 10cm strip from A4 card the first in black then the second is the next ink stamp until the sheet was full. I then trimmed of each end and cut the strips in to 1cm wide horizontally across the stamp,then halved the strips. Then weave with the strips until you have the size you need.
I forgot to actually take the black and grey but here is the grey and orange I made after.
After this I added tape to the back of the weave so it didn't fall apart then mounted it on silver miri (13cm sq) card then mounted on black card (14cm sq) then  on the 15cm  sq white card.

If you decide not to cut the panel up you could always mount it up as a very classy card.

To make the flowers I cut out 3 base flowers and 6 white flowers and stamped them with the border stamp.
then you need to cut the flowers in half and fold to make 1/8th .
Theses are then mounted on each alternate petal and topped with a dew drop.

I then stamped the art stamp  on to white card and mounted it up on silver and black to complement the rest of the card. Then adding dew drops to the other corners


Don't forget to check out our Facebook site and Blog regularly  to keep up to date with all the news, including current monthly challenges SPARKLE, offers and more.
 This is the same card stamped in the orange and grey, thought I would show it you made up.
Thanks for visiting if you like my card let me know you have visited, if you need anymore information on to how I did what don't hesitate to ask Thanks Tania x
Don't forget to visit the site for the links to the other design teams websites. Just click the logo to be taken on a visual adventure.

Challenges entered

Thursday, 1 November 2012

Let us "Sparkle"


Hi folks here is my card for the new monthly challenge Sparkle. give it a click and enter your card all stamps used for my card are from Visible Image . I have used the Chandelier from the Chandelier stamp set on a spellbinder circle of whisper white card from Stampin up. I first stamped the image with a black versafine pad this picked up all the details of the stamp also the ink dries quickly ,after that I used icicle stickles to cover the complete image, the stickle glue is slightly opaque so you can see the chandelier through the SPARKLE. I then let this dry overnight, due to thickness of the glue.
For the card base  I used a 15cm square white card and mounted a 14.5cm square of  redridinghood card from stampinup  the black card is already embossed with glitter and comes from the Noir et Chic pad from First Editions perfect for my sparkle card and complements the chandelier. I then used the red ridinghood ruffle ribbon down the left side and added iridescent stones. Once the image was dry I added a little yellow ink so the lights appear to be glowing  and mounted it on 3D tape. The sentiment is also from the chandelier set stamped on card withe versamark  and embossed then I finished off the sentiment topper with more iridescent stones.


Thanks for looking , don't forget to enter your SPARKLE card into the challenge with a chance to win great prizes.
DON'T FORGET to Keep up to date with all the current happenings on Facebook and New products.
New stamp big launch on the 3rd.
Thanks for calling by please let me know you have been.
Thanks txx
I have entered this card into the all things Sparkly from the Whimsy Stamps Challenge also entered Bling it up from Crafts and me Challenge blog

Wednesday, 31 October 2012

GET IN SHAPE!!!!!

Today's card is made with the butterfly stamp this is a large stamp but a little bird told me they are hoping to make a small stamp too. I love butterflies my darling husband tells me they are flies with posh coats but i don't believe him lol. I have taken a shaped card and stamped butterflies in melon mambo. First and second stamping and even third to give the feeling of depth to the card. The main focal butterfly I stamped on white card  first and second stamping then on embossable acetate and embossed in a clear glitter embossing powder. to mount it up I cut out the dark butterfly then the light bottom wings which are mounted on silicon glue then topped it off with the acetate.
I then went around the outside edge with  tempting turquoise ink, to give the whole card a feeling of depth i drew around the shaped card on white paper cut out the shape and tore pieces off to let it look like the butterfly was escaping. I then re stamped the butterflies and re inked in turquoise. I flat mounted the paper nearest the butterfly and 3d foamed to the edge of the card. The verse is a favourite of mine from the clock stamp time after time stamp set. Its a very apt verse as butterflies only live a short time. Thanks for looking let me know what you think. i do get lonely in blog land Tx

This card is entered into Get in shape Simon Says Stamp Challenge and Anything Goes from totally stampalicious


Sunday, 28 October 2012

Christmas Eve


Hi its Sunday again and here is my card, this week I have decided to do Christmas again. DON'T FORGET You still have chance to get the stamps with 25% off as long as you facebook Helen today (Sunday 28th).
So what have i done this week. I have used the great Christmas Eve poem stamped in versamark and embossed with black embossing powder I also used the same technique on the Sleigh Silhouette. I used green ink on the Trio of trees smallest tree to make my forest (I love this set its so versatile don't think its just for Christmas, I used it for my Autumn Card too) and embossed in clear embossing powder. The moon is  circle punched from a stick note(Sticky side) and this acts as a mask. The snow flakes are a versa mark pen that I then embossed with clear embossing powder. Then I dusted over with my brushes to add an assortment of blue distress inks, creating a evening scene. Once the ink is dry I then buffed it up with a dry tissue this removes the ink off the embossed area  and gives it a more gloss finish , I used whisper white card from stamping up but any quality stamping card will be fine.Finally  I used a clear star gelly roll pen to add  glitter to the moon and I also  used it to highlight the sleigh and reindeer s
. I then mounted the images on Snowy Acetate. Dont forget to cover the back of the image when its mounted.
Thank you for joining me in blog-land  please don't forget that the team at visible image are now running monthly challenges starting on the first of the month, they also have a new stamp launch on the 3rd.
Visit facebook to keep up to date with all the up coming excitement or/and sign up for the newsletter.
Thanks for visiting please let me know you have been , as i say its lonely here on my own :) Txx
card entered the 'Silhouettes' challenge from JoannaSheen
and Anything Goes with Card galore challenge blog.

Sunday, 21 October 2012

Two for the price of one

Hi folks here is my card/cards for this week. I first made the black and white card then decided to try it out in a different colour :).I cut a 4inch(12cm) square of whisper white card. Then I stamped the wrought iron corner 4 times in grey to form a frame.Secondly  I stamped the verse and  pocket watch in the centre of the card. I then used my blending pad to add a little black ink.  I also stamped the watch again onto spare card and glazed the face with glossy accents waited for it to dry ,think that's why I like embossing powder, its so much quicker ,once dry I  mounted the watch on 3D foam.
 The topper  was then mounted on black card.To make the backing paper I used  cheap computer printing paper and stamped it with the small polka dot and gingham background stamps . I then went over with black ink  to blend the paper in. Mounted again on black card and finished on a 6inch(15cm) scalloped card. To finish off i added clear dew drops I coloured on the bottom with promarker. I then used a spellbinder banner and stamped Happy birthday  .
 Then because i enjoyed making the card I did the all thing again but used raspberry ripple ink and card stock from stampin up .
The raspberry ripple one was finished off with red pearls.
So here they are together which do you like best ?? Thanks for stopping by, if you need any more information on any of the techniques , just ask. Please let me know you have visited it gets very lonely here on my own . Or you could join us on facebook or blog hop  for all the latest offers and challenges Txx

Sunday, 14 October 2012

Time flies

So its back to Christmas for me this week, I love the Christmas Collage its so useful . This time I have used an 8inch square card and added  stamps from time after time. I first stamped the snowy background stamp with versamark and dusted it with  silver Mica powder. I then used the grunge flourish to create a boarder around the navy card. I embossed it with white embossing powder mixed with silver mica powder. I did the same with the collage stamp and these are mounted it on pearlescent card.
I then stamped the clock face, wings and time flies and embossed them all in the same way. I then  mounted the clock and wings on 3d foam.

The time flies is mounted on pearlscent card just to finish it off. I hope you like my card, if you want anymore information please don't hesitate to get in touch.
thanks for stopping by, please let me know you've called Tania x

Sunday, 7 October 2012

Colours of Autumn

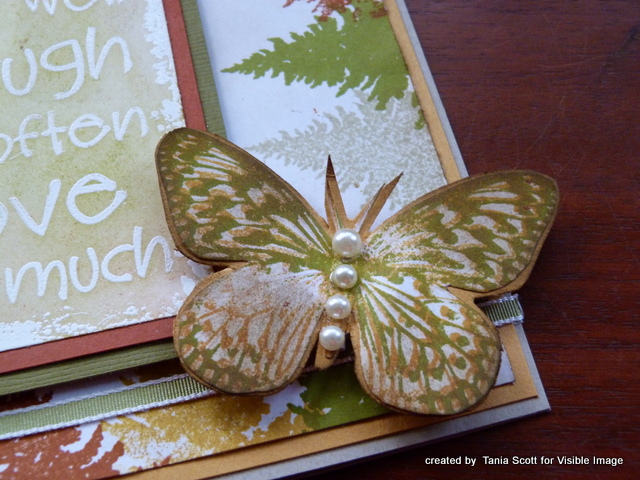
this is my card to promote the  inspired by Autumn challenge. I thought I would struggle because I always associate Autumn with the falling leaves, but after looking at my Visible image stamps I used the small and top of the medium tree from the Tree Trio and an assortment of inks, I used the beautiful butterfly stamp which I double stamped to get the two tone effect , with Visible image clear stamps you can match them up perfectly, I then mounted it on mustard card. I stamped the live well... verse and the back side of the grunge flouish for my sentiment topper I embossed it in clear white embossing powder then brushed over with inks to give an aged effect, all mounted on co-ordinating card from stampin up to match the inks

I mounted the butterfly on 3D foam and also the sentiment panel.

The butterfly was finished off with pearls.
Thanks for calling by if you like my card please let me know, If you want any more information on how I made the card please ask. Thanks Tania x

I have entered the Try it on Tuesday challenge, Fashionable Stamping Challenge
also the Allsorts challenge blog  and Joanna Sheen Challenge Blog hope they like my card Txx